Are you tired of battling dry, frizzy hair that just won’t cooperate, no matter how many expensive products you try? Imagine ditching those chemical-laden bottles for a natural, homemade elixir that actually works wonders. What if I told you the secret to luscious, vibrant hair is hiding in just a couple of simple ingredients you might already have?
It’s incredibly frustrating to deal with hair that lacks natural bounce and shine, especially when countless store-bought serums and oils promise miracles but deliver disappointment. Often, the harsh chemicals and heavy silicones found in commercial products only lead to scalp buildup or leave your strands feeling weighed down instead of truly nourished. This is precisely why crafting your own aloe vera oil has become a highly sought-after solution for those seeking a fresher, more natural approach to their daily hair care regimen.
Why Aloe Vera Oil Is a Must-Have in Your Natural Hair Care Arsenal
For centuries, aloe vera has been revered across diverse global beauty traditions for its incredibly soothing gel. When this potent gel is skillfully blended with a nourishing carrier oil, it transforms into a remarkably lightweight, deeply hydrating mixture that countless individuals enthusiastically incorporate into their beauty routines. This versatile plant is generously packed with essential vitamins, powerful enzymes, and beneficial amino acids, all contributing to its well-deserved reputation for fostering soft, wonderfully manageable hair.
But the benefits don’t stop there. Many devoted users enthusiastically report that consistent application of aloe vera-based oils significantly enhances the overall health and lustrous appearance of their hair. While individual results naturally vary, this fantastic DIY option empowers you with complete command over every single ingredient, ensuring a truly personalized and pure product.
So, What Exactly Is Aloe Vera Oil? Let’s Demystify It!
In essence, aloe vera oil is a carefully crafted infused oil, typically made by gently simmering fresh aloe vera gel with a chosen base oil, such as nourishing coconut or light olive oil. This meticulous process allows the invaluable beneficial compounds from the aloe plant to seamlessly transfer into the oil, culminating in a truly versatile and potent hair elixir.
Unlike pure aloe gel, which is water-based and prone to quick spoilage, the oil-infused version boasts a significantly extended shelf life and offers a much smoother, easier application experience for your hair.
And here’s a fascinating detail: the subtle green tint you often observe in homemade batches comes directly from the natural pigments inherent in fresh aloe leaves, a delightful sign of its authentic, natural origins.
Essential Ingredients You’ll Need for Your DIY Aloe Vera Oil Masterpiece
The journey to creating a successful batch begins with carefully selecting high-quality ingredients. Here’s your essential shopping list for whipping up a fundamental batch:
- 1-2 generously sized, fresh aloe vera leaves (opt for plump, vibrant leaves from a healthy plant or a trusted, reliable supplier)
- 2 cups of your preferred carrier oil (consider coconut oil for its convenient solid form at room temperature, or olive oil for a lighter, more fluid sensation)
- Optional enhancements: A few precious drops of vitamin E oil for an added layer of preservation, or a couple of drops of your favorite essential oil for a delightful aroma (lavender, for instance, offers a wonderfully calming scent)
Expert tip: For the absolute freshest and most potent results, always prioritize using fresh aloe vera leaves over store-bought gel whenever possible.
Are you eager to begin? The active preparation time for this process is roughly 30-45 minutes, followed by a crucial cooling period. Carefully follow these detailed instructions to achieve the absolute best results for your homemade oil.
Step 1: Meticulously Prepare Your Aloe Vera Leaves
Begin by carefully severing a large, healthy leaf from your aloe plant, using clean, sharp scissors. Rinse the leaf thoroughly under cool, running water to dislodge any accumulated dirt or debris. Gently pat it completely dry with a fresh, clean towel.
Next, meticulously slice away the sharp, spiky edges from both sides of the leaf. Then, employing a very sharp knife, you can either cut the leaf into small, manageable chunks or carefully scoop out the clear, succulent gel, depending on your preference. The visual of those translucent gel cubes perfectly illustrates the desired consistency here. Chop these into even smaller pieces; this significantly increases their surface area, facilitating a more effective infusion process.
Step 2: Gently Heat Your Chosen Carrier Oil
Carefully pour your 2 cups of selected carrier oil into a sturdy, heavy-bottomed pan or set up a double boiler. Begin to warm it over extremely low heat – the goal is for the oil to be warm, but absolutely not smoking or boiling vigorously. This gentle, controlled heat is crucial for efficiently extracting the beneficial properties from the aloe without causing any damage to its delicate compounds.
Step 3: Begin the Magical Aloe Vera Infusion
Carefully add the meticulously chopped aloe vera pieces or gel directly into the warm oil. Stir the mixture gently with a wooden spoon to ensure everything is thoroughly combined. Allow this concoction to simmer patiently on very low heat for a duration of 15 to 25 minutes. You’ll likely observe some gentle sizzling as the water content from the aloe gradually evaporates – this is a completely normal and essential part of the infusion process.
Maintain a watchful eye on the mixture and stir it occasionally to prevent sticking. As the aloe infuses, you’ll notice the oil subtly beginning to acquire a delicate green hue, signaling the successful transfer of the plant’s essence.
Step 4: Cool Down and Strain Your Elixir
Once the simmering is complete, remove the pan from the heat source and allow the entire mixture to cool down completely. This step is critically important for both safety and for preserving the quality and potency of your homemade oil.
After it has fully cooled, carefully pour the infused mixture through a fine mesh strainer or a piece of clean cheesecloth into a clean glass jar or bottle. Gently press down on the aloe solids to extract every last drop of precious oil. Once you’ve extracted all the oil, responsibly discard the leftover plant material.
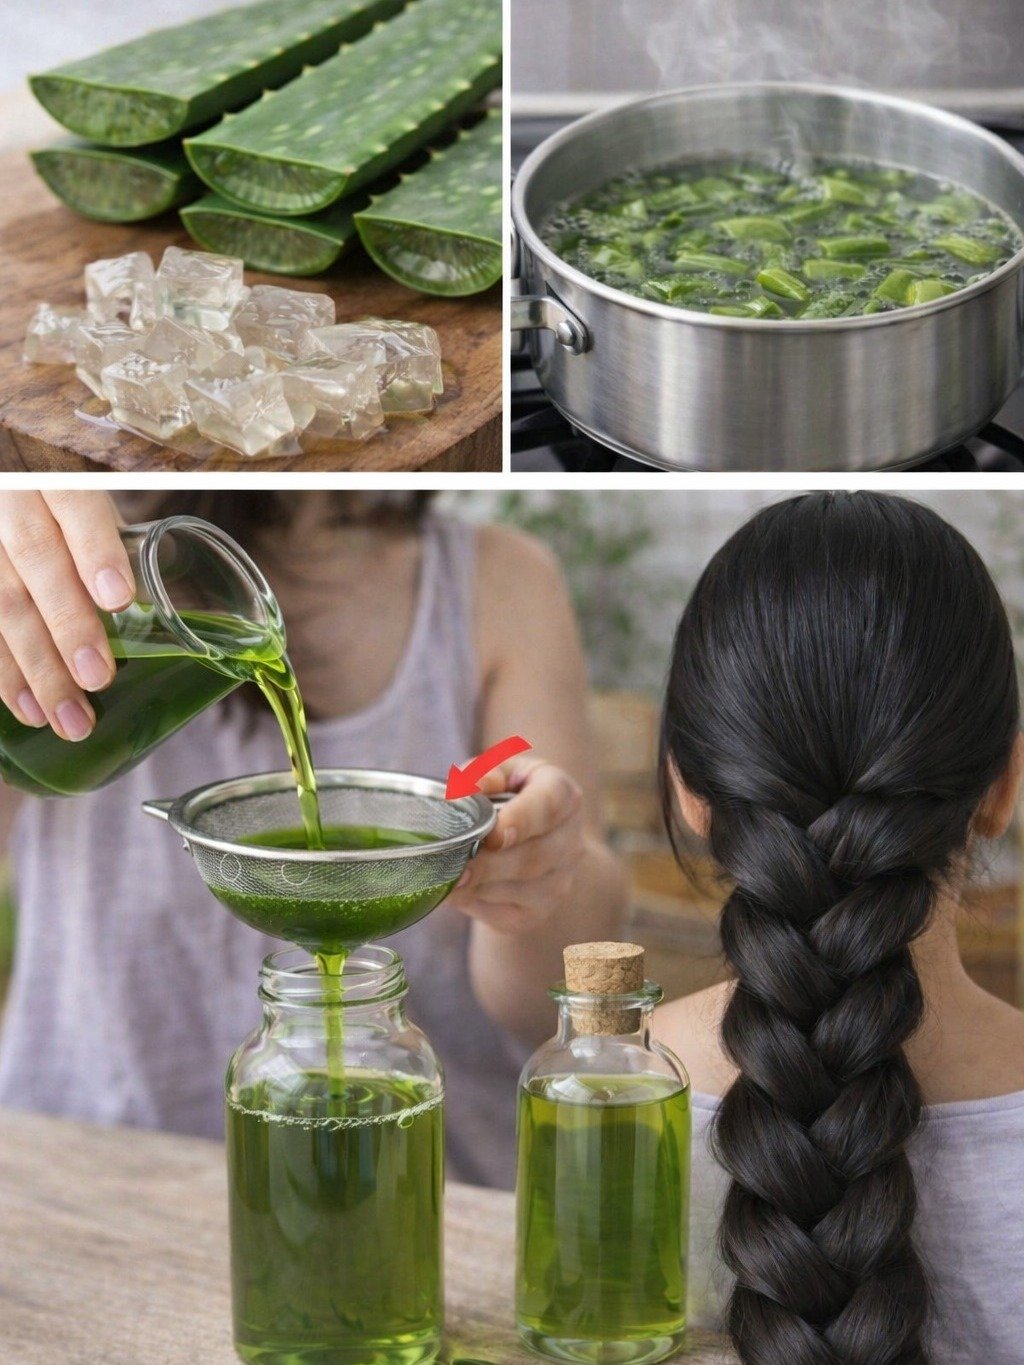
The straining stage is absolutely vital – it’s what ensures you achieve that perfectly smooth, beautifully usable oil, reminiscent of the pristine final bottles you might envision.
Step 5: Safely Store Your Homemade Liquid Gold
For optimal preservation, transfer your freshly made aloe vera oil into a dark glass bottle, if available, to shield it from light degradation. Don’t forget to label it clearly with the date of creation. Store your precious oil in a cool, dry, and dark place, such as a pantry or cabinet.
Now for the truly exciting part: Your oil is technically ready for immediate use, but allowing it to rest for an additional day or two can significantly deepen the infusion, enhancing its potency and aroma.
Pro Tips to Maximize the Benefits of Your Aloe Vera Oil
While making the oil is a fulfilling achievement, utilizing it effectively is where the real magic unfolds. Here are some actionable tips to help you get the absolute most out of your creation:
- Always perform a patch test first: Before full application, apply a tiny amount to your inner arm to check for any potential skin sensitivity or allergic reactions.
- Gently warm it slightly: Rub a small quantity of the oil between your palms to gently warm it before applying; this promotes better absorption into your hair and scalp.
- Combine with a soothing massage: For enhanced benefits, always massage the oil into your scalp using gentle, circular motions. This not only feels wonderful but also helps stimulate blood circulation.
But wait, there’s an extra layer of customization! Many individuals discover that incorporating a teaspoon of castor oil or a few properly diluted drops of rosemary essential oil into the final bottle can significantly enhance the oil’s texture and boost its hair-loving properties.
How to Effortlessly Incorporate Aloe Vera Oil into Your Hair Care Routine
Adding this incredible oil to your existing routine is refreshingly straightforward. Experiment with these versatile application methods:
- As a luxurious pre-wash treatment: Apply generously to dry hair and scalp, cover with a shower cap, and let it work its magic for 30-60 minutes, or even leave it on overnight for intensive conditioning. Afterward, simply shampoo your hair as you normally would.
- A soothing scalp massage oil: Dispense a few drops directly onto your scalp between washes for instant soothing relief and deep moisturization.
- A lightweight leave-in conditioner: Mix a tiny amount with your regular conditioner, or apply it very sparingly to your hair ends to boost shine and effectively control frizz throughout the day.
Remember to start with very small quantities – because it’s oil-based, a little truly goes a long way!
Unveiling How Aloe Vera Naturally Supports Gorgeous Hair Appearance
Aloe vera is a treasure trove of moisture-retaining compounds, making it a beloved ingredient for hair. Here’s a closer look at why it’s so cherished:
- It helps hair feel noticeably softer and deeply hydrated, combating dryness.
- May provide soothing relief for occasional scalp dryness or discomfort, promoting a healthier scalp environment.
- Contributes to a beautiful, shinier look after consistent, regular use, giving your hair a vibrant glow.
- Its natural versatility makes it incredibly easy to blend into a myriad of other natural hair recipes and formulations.
While some preliminary research has explored aloe vera’s role in skin and scalp hydration, the scientific community is always eager for more comprehensive studies. Nevertheless, its traditional use for beauty purposes spans countless cultures and generations.
Common Pitfalls to Steer Clear Of When Crafting Aloe Vera Oil
Even the simplest recipes can have potential missteps. Make sure to avoid these common errors:
- Applying high heat, which can unfortunately degrade and diminish the beneficial elements present in the aloe.
- Neglecting to strain the mixture thoroughly, which can lead to undesirable watery separation in your oil later on.
- Using old or yellowed aloe leaves; always prioritize fresh, vibrant leaves with clear gel for the best results.
Exciting Variations to Explore Once You’ve Mastered the Basic Recipe
Once you’re confident with the fundamental process, feel free to safely experiment with these creative variations:
- Coconut vs. Jojoba: Opt for coconut oil if you have thicker hair that craves rich moisture, or choose jojoba oil for a lighter, non-greasy feel, especially for finer hair.
- Infuse with essential oils: Enhance your oil with a few drops of essential oils like lavender for a calming aroma or tea tree oil for its clarifying properties (always remember to dilute them properly).
- Prepare a larger batch: Feel free to double the ingredients, but consistently adhere to the same low-heat cooking rules to maintain quality.
Optimal Storage Tips and Expected Shelf Life for Your Creation
Your homemade aloe vera oil, when stored correctly, typically maintains its potency and freshness for 2-3 months. Incorporating vitamin E oil can often help extend this shelf life even further. Before each use, always make it a habit to inspect your oil for any changes in smell or appearance, ensuring it remains at its best.
Crafting your very own aloe vera oil is an incredibly rewarding endeavor, empowering you to take complete control of your hair care journey using pure, natural ingredients. With this comprehensive, straightforward guide, you now possess all the essential knowledge and steps required to create a batch that seamlessly integrates into your routine, promising you softer, more manageable hair.
Why not give it a try this upcoming weekend and personally experience the incredible transformation? Your hair – and quite possibly your wallet – will undoubtedly thank you for it!
FAQ
How long does it typically take to observe results from using aloe vera oil on hair?
Individual results can vary, but many users report noticing softer hair and improved moisture levels after just a few consistent applications over a period of 2-4 weeks.
Can I safely use aloe vera oil if my hair is colored or has undergone chemical treatments?
Yes, aloe vera oil is generally considered gentle. However, it’s always prudent to perform a small patch test first. It can be particularly beneficial for helping to restore moisture to processed hair.
Is it possible and safe to make aloe vera oil without any specialized equipment?
Absolutely! All you truly need is a basic saucepan, a sharp knife, and a strainer to achieve excellent results. No fancy tools are required to create this wonderful hair treatment.
Disclaimer: The information provided in this article is intended solely for educational and informational purposes. It should not be considered a substitute for professional medical or dermatological advice. Always consult a qualified healthcare provider before trying any new hair care products, especially if you have known allergies, pre-existing skin conditions, or other health concerns. Please remember that individual results may vary significantly.