“`json
{
“title”: “Natural Skin Tag Removal at Home: The Vaseline Method Explained (Beyond ‘One-Night’ Claims)”,
“content”: “
Natural Skin Tag Removal at Home: The Vaseline Method Explained (Beyond ‘One-Night’ Claims)
\n\n
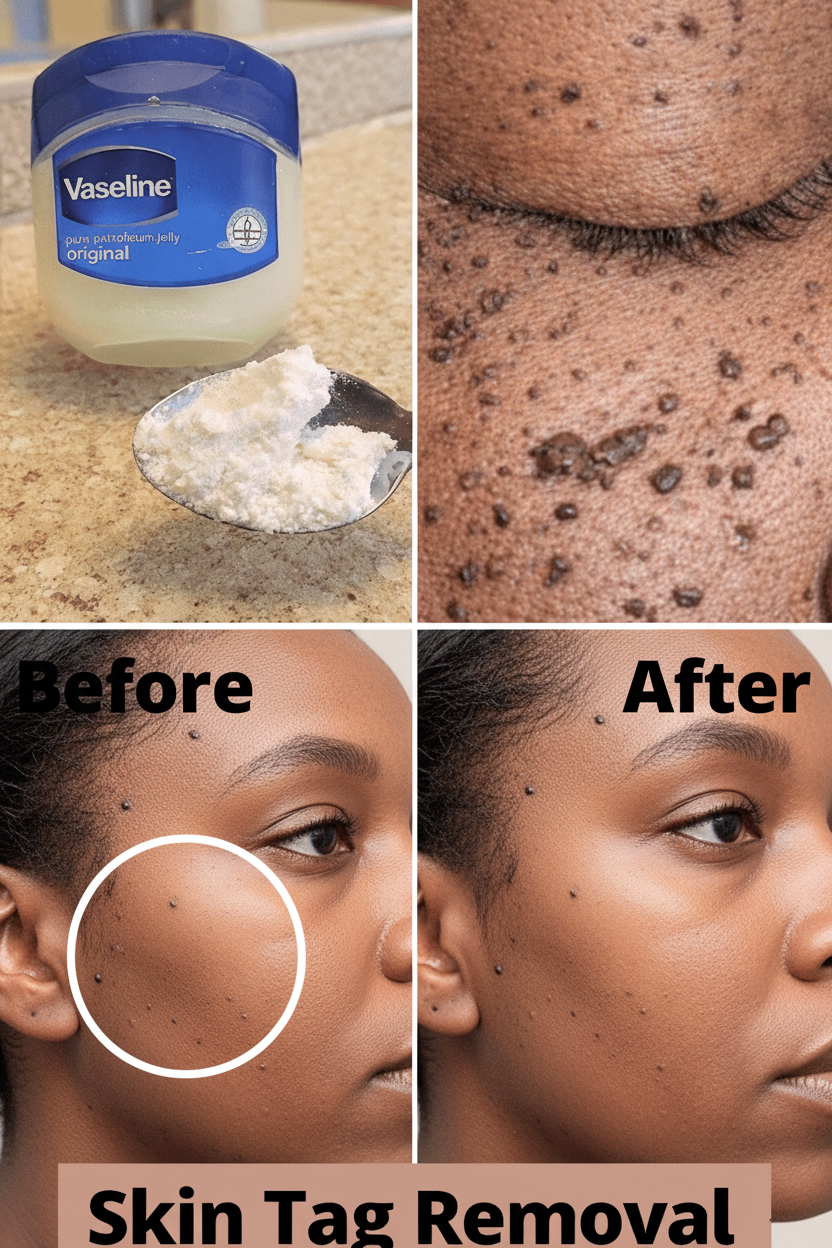
Skin tags, those small, soft, benign growths of skin that often appear in areas of friction or skin folds, are typically harmless. However, their presence can be bothersome, especially when located on the neck, armpits, eyelids, groin, or beneath the breasts. Many individuals seek a quick, painless, and natural way to remove them in the comfort of their own homes. Among the most widely shared and surprisingly effective DIY approaches is the method combining Vaseline with other common household items.
\n\n
Setting Realistic Expectations: It’s Not an Instant Fix
\n\n
Before diving into the methods, it’s crucial to address a common misconception: no method, whether natural or medical, reliably removes a skin tag in a single night for everyone. While some anecdotal claims or heavily edited photos might suggest instant results, most home remedies require consistent application over 3 to 14 days for the tag to gradually darken, dry out, and naturally detach. Claims of \”gone in one night\” are generally exaggerated, or refer to extremely small, loose tags on the verge of falling off anyway. Nevertheless, the Vaseline-based approach stands out as one of the gentlest, safest, and most popular natural methods that genuinely works for many when applied correctly over time.
\n\n
Understanding How Vaseline Enhances Skin Tag Removal
\n\n
Petroleum jelly, commonly known as Vaseline, doesn’t actively remove skin tags on its own. Instead, it serves as a powerful occlusive barrier, playing several key roles in the removal process:
\n
- \n
- Moisture Retention: It effectively traps moisture, which helps to soften both the skin tag and the surrounding skin.
- Protection: Vaseline prevents the skin tag from drying out too rapidly, which could otherwise lead to pain or bleeding. It also safeguards the healthy skin around the tag from the active irritant.
- Enhanced Efficacy: By creating a sealed environment, Vaseline keeps the active irritant in sustained contact with the skin tag, thereby accelerating the desiccation (drying) and darkening process that precedes its natural detachment.
\n
\n
\n
\n
The most effective Vaseline combinations pair it with a mild natural irritant. These irritants work by gradually cutting off the blood supply to the tag, causing it to necrose (die) and eventually fall off.
\n\n
Top 3 Effective Vaseline-Based Methods for Skin Tag Removal
\n\n
Here are the most popular and proven combinations, ranked by their general effectiveness and gentleness:
\n\n
Method 1: Vaseline + Tea Tree Oil (Popular & Gentle Choice)
\n
Why it works: Tea tree oil is renowned for its potent antimicrobial and mildly irritating properties. When applied, it induces a controlled inflammatory response that helps to dry out the skin tag. Vaseline, meanwhile, provides a protective barrier for the surrounding healthy skin and helps to concentrate the tea tree oil’s action on the tag.
\n
How to do it:
\n
- \n
- Thoroughly clean and dry the area around the skin tag.
- Apply a very thin layer of pure Vaseline around the base of the tag to protect the surrounding normal skin.
- Dip a clean cotton swab into 100% pure tea tree essential oil and dab it directly onto the skin tag only, avoiding contact with healthy skin.
- Cover the treated tag with a small amount of Vaseline on top to seal the tea tree oil in and maintain its contact.
- (Optional): For added protection or to keep it in place, cover with a small bandage.
- Leave on overnight. Repeat this process every night.
\n
\n
\n
\n
\n
\n
\n
Expected Timeline: Most individuals observe the tag darkening, shrinking, and falling off naturally within 3-10 days, with an average of 5-7 days.
\n\n
Method 2: Vaseline + Garlic (Stronger & Faster Acting)
\n
Why it works: Garlic contains allicin, a powerful compound known for its strong antimicrobial and irritating effects. This helps to accelerate the drying and detachment of the skin tag more quickly than some other methods.
 \n
\n
How to do it:
\n
- \n
- Crush one small, fresh garlic clove and let it sit for about 10 minutes to activate its compounds.
- Apply Vaseline around the base of the skin tag to shield the healthy skin.
- Dab a tiny amount of the crushed garlic directly onto the skin tag itself.
- Cover the garlic with another layer of Vaseline.
- (Optional): Secure with a bandage if needed.
- Leave on overnight and rinse the area thoroughly in the morning.
\n
\n
\n
\n
\n
\n
\n
Expected Timeline: Darkening and detachment are typically seen within 4-10 days.
\n\n
Method 3: Vaseline + Baking Soda Paste (Gentle Abrasive Action)
\n
Why it works: Baking soda provides a mild abrasive action that helps to gently exfoliate the surface of the tag while also contributing to its drying. Vaseline, as always, protects the surrounding skin from irritation.
\n
How to do it:
\n
- \n
- Mix 1 teaspoon of baking soda with just enough water to form a thick, manageable paste.
- Apply Vaseline around the base of the skin tag to protect healthy skin.
- Dab the baking soda paste directly onto the tag.
- Cover with a small amount of Vaseline on top to seal it.
- Leave on overnight and rinse in the morning.
\n
\n
\n
\n
\n
Expected Timeline: Gradual drying and eventual detachment are usually observed within 7-14 days.
\n\n
Realistic Expectations and What to Expect
\n\n
Understanding the typical progression can help manage expectations:
\n
- \n
- Days 1-3: The skin tag often begins to darken (turning brown or black) and may shrink slightly.
- Days 4-10: Most skin tags will dry up, scab over, and fall off naturally. When done correctly, this process is usually painless.
- 2-4 Weeks: For larger tags, complete removal and subsequent skin healing (often flat without scarring) can take up to a month.
\n
\n
\n
\n
Success Rate: Approximately 60-85% of consistent users report full removal within 1-3 weeks. This method generally works best on small to medium-sized tags (e.g., pea-sized or smaller). Larger or stalk-less tags might require more time or could necessitate professional dermatological removal.
\n\n
Crucial Safety Warnings (Do NOT Skip These!)
\n\n
While natural remedies can be effective, safety should always be your top priority. Many viral videos often overlook these critical precautions:
\n
- \n
- Never Attempt to Cut or Tie Off Skin Tags at Home: This carries a high risk of infection, significant bleeding, and permanent scarring.
- Exercise Extreme Caution on Sensitive Areas: Avoid using these methods on the face, near the eyes, or on genital areas without explicit caution, as the skin in these regions is much thinner and highly sensitive.
- Always Perform a Patch Test: Before full application, apply a small amount of your chosen mixture to an inconspicuous area (e.g., inner arm) 24 hours prior to check for any adverse reactions.
- Discontinue Use Immediately If Irritation Occurs: If you experience severe redness, intense burning, swelling, excessive pain, or pus, stop the treatment at once and clean the area.
- Consult a Dermatologist For Suspicious Tags: If a skin tag bleeds, grows rapidly, changes color or shape, becomes painful, or if you are unsure of its identity, seek professional medical advice. These could be signs of skin cancer or other underlying conditions requiring expert diagnosis.
- Pediatrician Approval for Children: Do NOT use these methods on children without prior approval and guidance from a pediatrician.
\n
\n
\n
\n
\n
\n
\n\n
The Bottom Line
\n\n
The Vaseline method, when combined with natural irritants like tea tree oil, garlic, or baking soda, offers a gentle, cost-effective, and surprisingly effective way to remove small to medium-sized skin tags at home. While it’s not an overnight solution, consistent application over 3-14 days often leads to successful removal with minimal discomfort or scarring. Always prioritize safety and consult a healthcare professional if you have any concerns or if a tag appears suspicious.
”
}
“`