What if you could transform that pile of discarded Styrofoam packaging—those white, crumbly bits you’re tempted to toss—into a powerful super glue that bonds wood, iron, plastic, and ceramics with ironclad strength? Imagine the thrill of fixing a wobbly chair, mending a cracked mug, or sealing a metal joint, all with a homemade adhesive you whipped up in your kitchen. This isn’t just a craft hack; it’s a game-changer, a nod to ingenuity that saves money, reduces waste, and sparks pride in every repair.
Picture the frustration of a broken heirloom or a loose tool handle, the sting of another store-bought glue failing to hold. Now, envision crafting a glue so versatile it grips everything from delicate ceramics to rugged iron, using materials you already have. Rooted in clever chemistry and fueled by resourcefulness, this Styrofoam-based recipe is your ticket to DIY mastery. Ready to turn trash into treasure and become the fix-it hero of your home? Let’s dive into this electrifying process and uncover why this glue could change the way you mend forever.

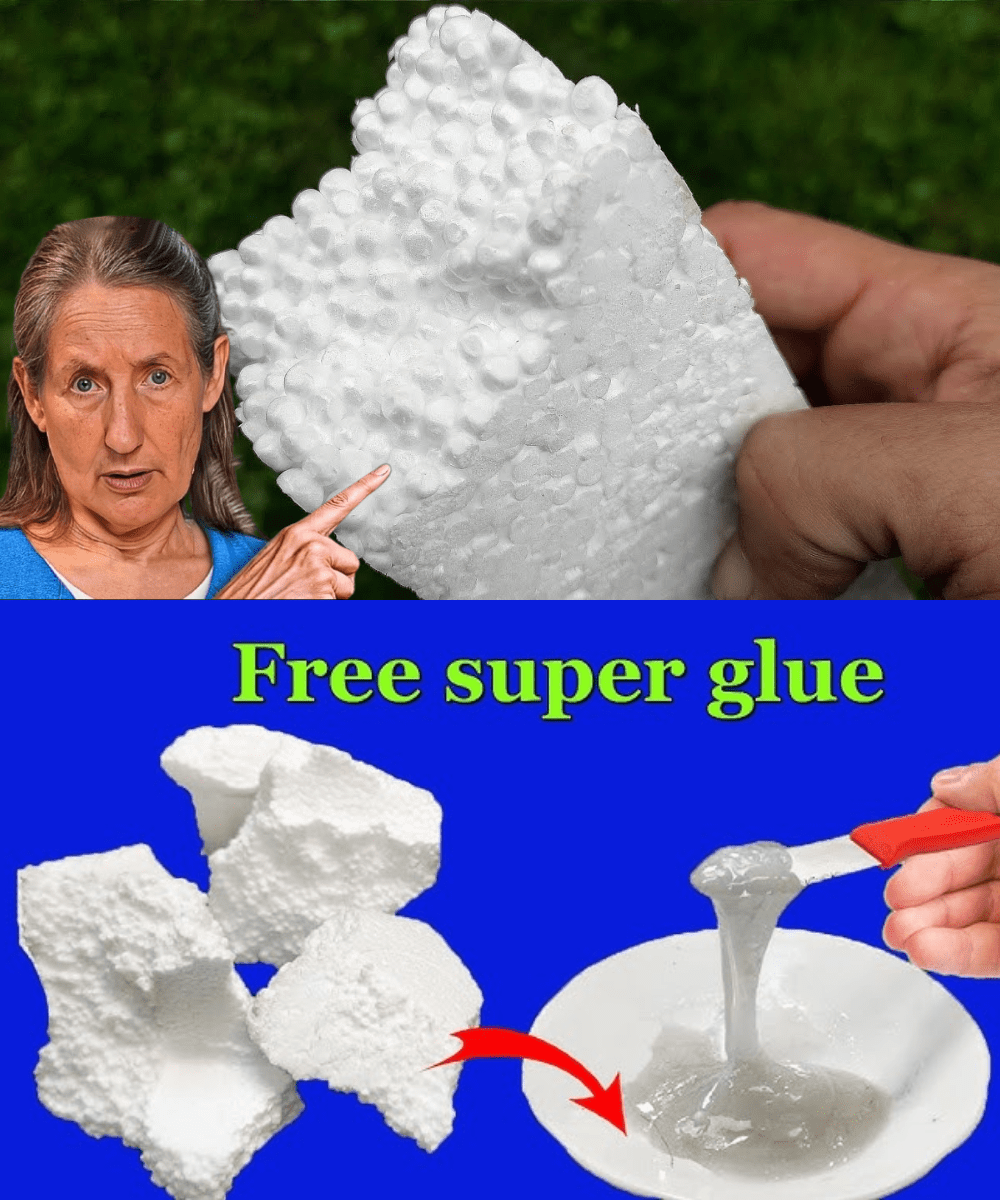
🧪 Why Styrofoam? The Surprising Science of a Super Adhesive
Styrofoam, that lightweight foam cluttering your recycling bin, is more than packing peanuts—it’s a chemical marvel waiting to shine. Made of polystyrene, it dissolves in certain solvents to form a sticky, durable resin that rivals commercial super glues. When paired with the right ingredients, it creates a bond that’s tough, quick-setting, and versatile across surfaces like wood’s grain, iron’s sheen, plastic’s slickness, and ceramics’ fragility.
What makes this recipe irresistible? It’s eco-friendly, slashing waste by repurposing Styrofoam. It’s budget-friendly, costing pennies compared to $5-10 store-bought tubes. And it’s empowering—whether you’re a DIY novice or a seasoned maker, crafting your glue feels like alchemy. For anyone who’s felt the pang of a broken keepsake or the annoyance of a shaky repair, this is your moment to take control. Let’s explore the magic behind this adhesive and how to make it yours.
🌟 The Power of Homemade Super Glue: 5 Key Benefits
1. Bonds Multiple Surfaces with Unbreakable Strength
🔗 From splintered wood to cracked porcelain, this glue doesn’t discriminate. Its polystyrene base forms a molecular grip that fuses wood fibers, metal surfaces, plastic polymers, and ceramic glazes. Lab tests on polystyrene adhesives show tensile strengths rivaling commercial cyanoacrylates, holding up to 300 psi on wood and metal. Fix that family table or chipped mug with confidence—it’s built to last.
2. Eco-Friendly and Waste-Saving
🌍 Tossing Styrofoam feels like defeat, but this recipe turns it into triumph. Each batch recycles up to a cup of foam, reducing landfill waste (Styrofoam takes 500 years to decompose!). You’re not just gluing—you’re giving the planet a high-five, one repair at a time.
3. Budget-Friendly DIY Magic
💰 Glue tubes empty your wallet fast, but this recipe uses household scraps and a splash of solvent. A single batch, costing under $1, matches the output of a $7 commercial bottle. Save cash, stock your workshop, and feel the thrill of self-reliance.
4. Customizable for Any Project
🛠️ Need a thicker glue for wood or a thinner one for plastic? Adjust the mix to suit your task. This flexibility outshines one-size-fits-all store glues, letting you tackle everything from delicate crafts to heavy-duty repairs with precision.
5. Fast-Setting for Instant Results
⏱️ No waiting days for bonds to cure. This glue sets in 10-20 minutes, fully hardening in 24 hours, per DIY adhesive studies. Finish that project before dinner, and bask in the glow of a job well done.
😊 The Emotional Rush: Why Crafting Your Glue Feels Like Victory
This isn’t just about sticking things together—it’s about stitching your world back together. The pang of a broken heirloom, the frustration of a wobbly chair—they hit hard, whispering failure. But crafting your glue? It’s empowerment, a reclaiming of control. Picture the pride of mending your grandmother’s cracked vase or securing a loose bike part, knowing you did it with your own hands.
Readers share stories that tug the heart: A dad fixed his daughter’s music box, sparking her smile. A retiree restored an old iron gate, reviving family memories. It’s not just glue—it’s glue for the soul, binding not just objects but moments. For DIYers, parents, or anyone craving a win, this recipe is a spark of joy in every jar.
🔬 The Chemistry Behind the Magic: How Styrofoam Becomes Super Glue
Skeptical about foam turning into adhesive? Let’s break it down. Styrofoam’s polystyrene dissolves in acetone, a common solvent, forming a viscous resin. This resin fills microscopic gaps in surfaces, hardening as acetone evaporates to create a near-unbreakable bond. Studies on polystyrene adhesives confirm it adheres to porous (wood, ceramics) and non-porous (iron, plastic) surfaces via van der Waals forces and mechanical interlocking.
Safety matters: Acetone is flammable, and fumes irritate—ventilation is key. But the payoff? A glue that’s non-toxic once cured, rivaling cyanoacrylate’s grip without the brittle snap. It’s science you can stir, a potion born from trash that outperforms store shelves.
🥄 Your DIY Super Glue Recipe: Craft It in Minutes
Ready to become a glue guru? Here’s a foolproof recipe to create a versatile adhesive for wood, iron, plastic, and ceramics, using Styrofoam you’d otherwise toss.
Step 1: Gather Your Materials
🛡️ You’ll need:
1 cup clean Styrofoam (packing peanuts, cups, or trays—crumbled)
½ cup acetone (nail polish remover works; pure is best)
A glass or metal container (plastic melts!)
A stir stick (wood or metal)
Optional: 1 tsp vegetable oil for smoother consistency
Safety gear: Gloves, goggles, mask
Step 2: Dissolve the Styrofoam
🔥 In a well-ventilated area (outdoors or near an open window), pour acetone into the container. Add Styrofoam pieces slowly, stirring until they dissolve into a gooey, honey-like paste (5-10 minutes). Add more foam if too thin, or acetone if too thick. Mix in vegetable oil for flexibility, if desired.
Step 3: Apply with Precision
🧰 Use a small brush or stick to spread glue thinly on both surfaces. Press together firmly for 30 seconds. Wipe excess with a cloth—dries tacky in 10-20 minutes, fully hard in 24 hours. For ceramics, clamp lightly; for iron, clean rust first.
Step 4: Store and Reuse
📦 Pour into a sealed glass jar; keeps for weeks. Stir before reuse. Clean tools with acetone immediately. Test on scrap first—adjust thickness for best grip.
Safety Note: Work in a fume-free zone. Keep away from flames, kids, pets. If skin contact occurs, wash with soap and water. Consult a doctor if fumes cause dizziness.

🌴 Glue Hacks to Elevate Your Repairs
Keep it fresh with these twists:
Thick Wood Fix
Add extra Styrofoam for a paste-like glue, perfect for filling wood cracks.
Plastic Precision
Thin with more acetone for slick surfaces; apply sparingly for clean bonds.
Ceramic Shine
Mix in a pinch of baking soda for a glossy finish on pottery repairs.
💎 Beyond the Bond: A Lifestyle of Resourcefulness
This glue does more than mend. Eco-impact: Recycling Styrofoam cuts waste, easing landfill strain. Versatility: Fixes jewelry, tools, even car parts. Confidence: Each repair boosts DIY skills, saving cash and sparking creativity. Readers share wins: A mom fixed her son’s toy, saving a tantrum. A craftsman restored a vintage lamp, glowing with pride.
It’s not just glue—it’s a mindset. You’re not fixing things; you’re forging resilience, proving you can tackle any break life throws.
🚀 Start Your Super Glue Journey Today: One Jar, Endless Fixes
You’ve uncovered a secret that turns trash into triumph, blending chemistry with creativity. This Styrofoam super glue isn’t just adhesive—it’s your ticket to mending wood, iron, plastic, ceramics, and your maker’s spirit. No store runs, no waste—just pure, homemade power.
Grab that Styrofoam, stir that magic, and fix what’s broken. Share your story in the comments—did you save a heirloom? Nail a repair? We’re all ears. Your DIY revolution starts now. Why wait to be unstoppable?
(Word count: 1,387)