You might be surprised to learn that this transformative process is far less complicated than it appears, requiring only a handful of common items from your pantry or garden. Keep reading, as I’m about to unveil not just the precise, easy-to-follow steps, but also an ingenious customization hack that will allow you to tailor your homemade elixir perfectly to your unique hair type and concerns.
Why Aloe Vera Oil Is a Favorite in Natural Hair Care
For centuries, aloe vera’s incredibly soothing gel has been a revered staple in beauty rituals across the globe. When this miraculous gel is thoughtfully blended with a nourishing carrier oil, the result is a wonderfully lightweight yet deeply hydrating concoction that countless individuals enthusiastically embrace in their regular beauty regimens. This remarkable plant is brimming with essential vitamins, powerful enzymes, and beneficial amino acids, all of which solidify its long-standing reputation for promoting hair that feels incredibly soft and beautifully manageable.
Yet, the benefits extend even further. A multitude of devoted users consistently share how incorporating aloe vera-infused oils into their routine helps their hair not only look but also feel significantly healthier and more vibrant. While personal outcomes can naturally differ, opting for this DIY approach empowers you with complete mastery over every single ingredient.
What Is Aloe Vera Oil Exactly?
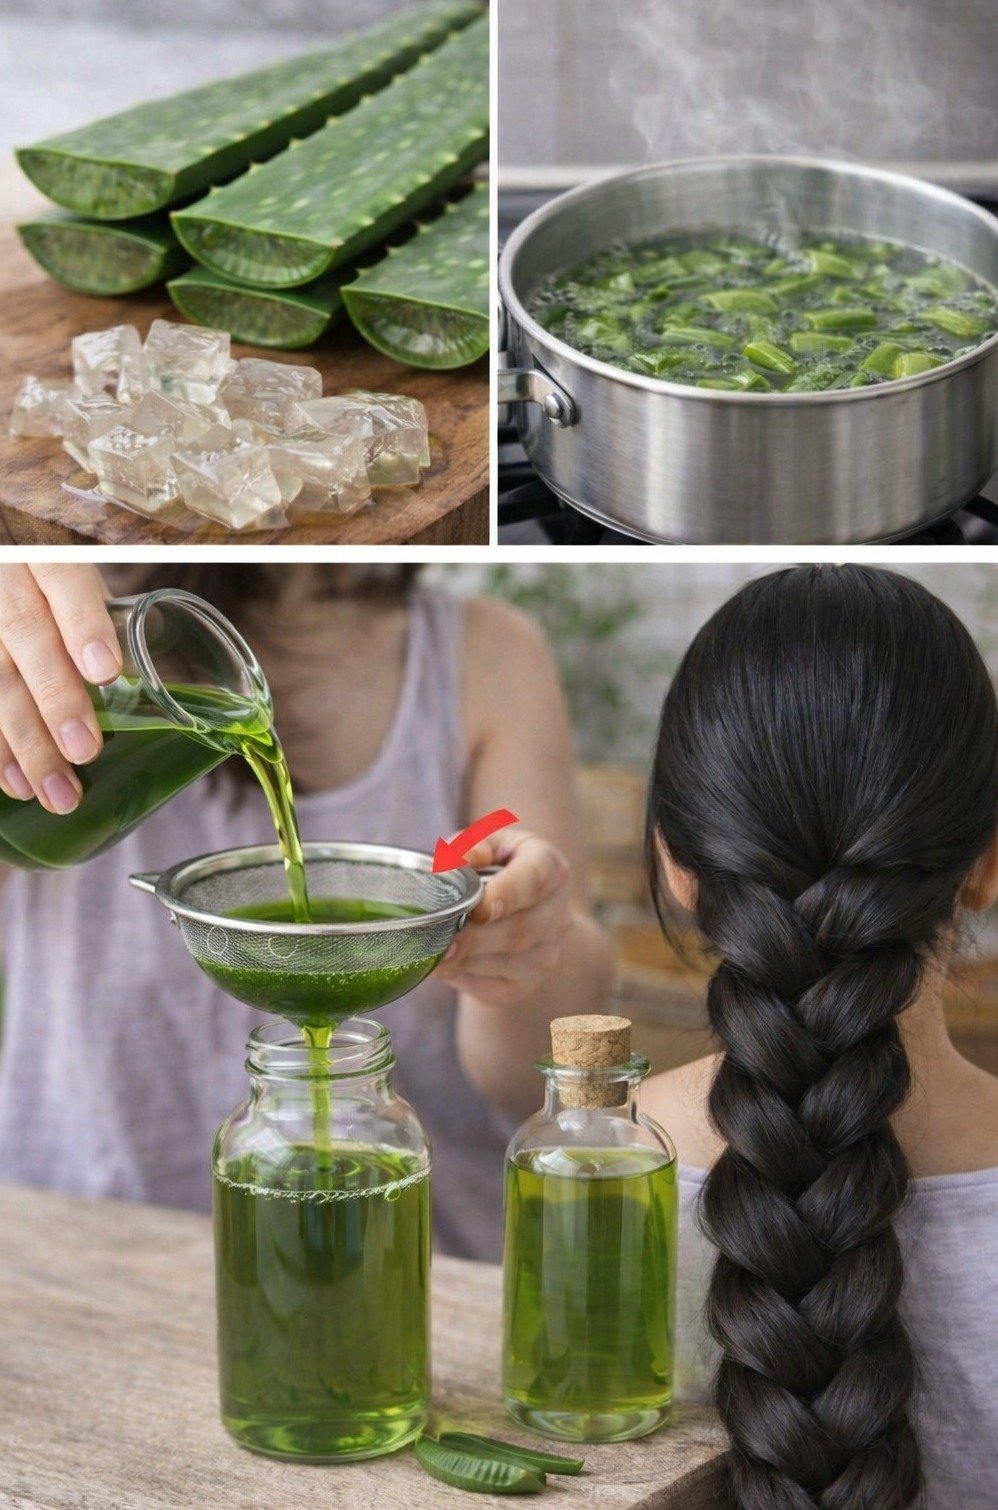
At its core, aloe vera oil is essentially an infused oil, crafted by carefully simmering fresh aloe vera gel alongside a chosen base oil, such as rich coconut or light olive oil. This gentle heating process facilitates the transfer of aloe’s remarkable beneficial compounds directly into the oil, culminating in a truly versatile and potent hair elixir.
In stark contrast to pure aloe gel, which is predominantly water-based and prone to rapid spoilage, the oil-infused variant boasts a considerably extended shelf life and offers a much smoother, more convenient application experience for your hair.
And here’s a little secret that often sparks curiosity: that distinctive green hue frequently observed in homemade aloe vera oil isn’t artificial; it’s simply the natural pigments extracted directly from the fresh aloe leaves during the infusion process.
Ingredients You’ll Need for Your DIY Aloe Vera Oil
Embarking on this journey begins with sourcing top-notch ingredients. For crafting your foundational batch, here’s the essential list you’ll want to have on hand:
- **Fresh Aloe Vera Leaves:** You’ll need 1-2 large, plump leaves, ideally from a thriving plant or a trusted organic supplier, ensuring maximum potency.
- **Your Chosen Carrier Oil:** Prepare 2 cups of either coconut oil (excellent if you prefer a solid base that melts easily) or olive oil (perfect for a lighter, more fluid consistency).
- **Optional Enhancements:** Consider adding a few drops of vitamin E oil to naturally boost preservation, or incorporate a couple of drops of your preferred essential oil, such as calming lavender, for a delightful aroma.
**Expert Tip:** For unparalleled freshness and the highest concentration of beneficial compounds, always prioritize using fresh aloe vera leaves over pre-packaged, store-bought gels whenever you can.
Eager to begin your hair transformation? This hands-on creation requires approximately 30-45 minutes of active preparation, followed by a crucial cooling period. To ensure you achieve the most exceptional results, meticulously follow each of these steps.
Step 1: Prepare the Aloe Vera Leaves
Begin by carefully harvesting a robust leaf from your aloe plant, using a pair of freshly cleaned scissors. Give it a thorough rinse under cool running water to eliminate any surface dirt or impurities, then gently pat it completely dry with a clean towel.
With precision, trim off the serrated, sharp edges from both sides of the leaf. Next, employing a sharp knife, either slice the entire leaf into small, manageable chunks or, if you prefer, meticulously scoop out the pristine, clear gel. Those beautiful, translucent gel cubes you might envision are precisely what you’re striving for. Further dice these pieces into smaller segments; this maximizes their surface area, allowing for a far more efficient infusion process.
Step 2: Heat Your Carrier Oil
Carefully measure and pour your 2 cups of chosen carrier oil into a sturdy, heavy-bottomed pan or set up a double boiler. Begin warming the oil over extremely low heat; the goal is a gentle warmth, not vigorous boiling or smoking. This controlled, mild heat is crucial for effectively extracting the beneficial properties from the aloe without compromising its delicate compounds.
Step 3: Infuse the Aloe Vera
Now, introduce the prepared chopped aloe vera pieces or gel into the gently warmed oil. Stir the mixture softly with a wooden spoon to ensure everything is well combined. Let this blend simmer patiently on low heat for a duration of 15 to 25 minutes. Don’t be alarmed if you observe some gentle sizzling; this is a completely normal indication that the water content from the aloe is successfully evaporating, a vital step in the infusion.
Maintain a watchful eye on your concoction, stirring it periodically. You’ll likely notice the oil gradually acquiring a delicate green tint as the aloe’s essences become fully infused.
Step 4: Cool and Strain
Carefully take the pan off the heat source and allow the entire mixture to cool down thoroughly and completely. This step is paramount, not only for your safety but also for meticulously preserving the quality and potency of your freshly infused oil.
Upon reaching room temperature, carefully pour the infused mixture through a fine mesh strainer or several layers of cheesecloth directly into a pristine glass jar or bottle. Gently press down on the remaining aloe solids to ensure you extract every last precious drop of oil. Once complete, responsibly discard the spent plant material.
This meticulous straining phase is absolutely critical; it’s precisely what yields the beautifully smooth, clear, and perfectly usable oil, reminiscent of those elegant finished products you admire.
Step 5: Store Your Homemade Oil
For optimal preservation, transfer your freshly made oil into a dark glass bottle, which helps shield it from light degradation. Don’t forget to clearly label it with the creation date. Store this precious elixir in a cool, dark environment, such such as a pantry or cabinet.
Here comes the exciting reveal: your homemade aloe vera oil is immediately ready for use! However, allowing it to rest for an additional day or two can significantly deepen the infusion, potentially enhancing its potency even further.
Pro Tips to Maximize the Magic of Your Aloe Vera Oil
While crafting this incredible oil is a rewarding accomplishment, unlocking its full potential truly happens when you apply it with intention. Here are some highly actionable tips to ensure you get the most out of every drop:
- **Always Patch Test:** Before widespread application, dab a tiny amount onto a discreet area of your inner arm. Wait 24 hours to ensure no adverse reactions or sensitivities occur.
- **Gentle Warming is Key:** Prior to application, warm a small amount of oil by rubbing it between your palms. This slight warmth enhances absorption and spreadability.
- **Boost with Massage:** When applying to your scalp, always incorporate gentle, circular massage motions. This not only aids absorption but also stimulates blood circulation, promoting a healthier scalp environment.
Hold on, because there’s an extra layer of brilliance! Many users discover that incorporating a teaspoon of nourishing castor oil or a few drops of properly diluted rosemary essential oil into the finished bottle can significantly elevate the oil’s texture and overall benefits.
Unlock Its Power: Effortless Ways to Apply Aloe Vera Oil to Your Hair
Weaving this potent oil into your regular hair care regimen is remarkably simple and versatile. Explore these effective application methods:
- **Deep Pre-Wash Treatment:** Generously apply the oil to your dry hair and scalp. For an intensive conditioning boost, cover your head with a shower cap and allow it to penetrate for 30-60 minutes, or even leave it on overnight, then proceed with your usual shampoo routine.
- **Soothing Scalp Massage:** Between washes, dispense just a few drops directly onto your scalp. Gently massage it in to provide instant soothing relief and deep moisturization.
- **Light Leave-In & Frizz Control:** Blend a minuscule amount with your favorite regular conditioner, or apply it very sparingly to your hair ends. This acts as a lightweight leave-in, imparting brilliant shine and expertly taming frizz.
Always begin with a conservative amount; remember, a little of this concentrated, oil-based elixir goes an incredibly long way to achieve desired results.
The Science-Backed Beauty: How Aloe Vera Elevates Your Hair’s Appearance
Aloe vera is celebrated for its abundant moisture-retaining compounds and a wealth of beneficial nutrients. Here’s a closer look at precisely why it’s so adored in the world of natural beauty:
- **Unlocks Supreme Softness:** It deeply nourishes, helping your hair feel incredibly softer and significantly more hydrated from root to tip.
- **Calms and Comforts Scalp:** May provide soothing relief for occasional scalp dryness, itchiness, or general discomfort, fostering a healthier environment for hair growth.
- **Boosts Natural Luster:** Consistent application contributes to a noticeably shinier, more radiant hair appearance, reflecting light beautifully.
- **Versatile Elixir:** Its adaptability makes it incredibly easy to seamlessly integrate into a myriad of other natural hair care formulations and DIY recipes.
While initial research has explored aloe vera’s profound impact on skin and scalp hydration, the scientific community is always keen for more comprehensive studies. Nevertheless, its time-honored application in beauty rituals spans across countless cultures, cementing its legacy as a trusted botanical.
Rookie Blunders: Key Mistakes to Sidestep When Crafting Aloe Vera Oil
Even the most straightforward DIY recipes can have hidden traps. Ensure your success by actively avoiding these common missteps:
- **Overheating:** Applying excessively high heat can irreversibly damage and degrade the delicate beneficial compounds within the aloe, diminishing the oil’s potency.
- **Incomplete Straining:** Failing to strain the mixture meticulously can result in unwelcome watery separation or a murky texture in your final oil over time.
- **Subpar Aloe:** Opting for old, discolored, or yellowing aloe leaves can introduce undesirable compounds and reduce effectiveness. Always prioritize fresh, vibrant leaves with clear gel.
Level Up Your DIY: Exciting Variations Once You’ve Mastered the Basics
After you’ve confidently mastered the foundational recipe, feel empowered to safely explore these exciting variations to further personalize your creation:
- **Carrier Oil Swap:** Experiment with different base oils; coconut oil is superb for thicker, thirstier hair, while jojoba offers a wonderfully lighter touch, ideal for finer strands.
- **Aromatherapy Boost:** Infuse a few drops of your favorite essential oils, such as soothing lavender or purifying tea tree, for an added sensory experience and targeted benefits (always remember to dilute properly!).
- **Batch Up:** Confidently double or even triple the ingredient quantities to create a larger supply, but consistently adhere to the same gentle, low-heat infusion principles.
Preserve Your Potency: Storage Tips & Expected Shelf Life
When meticulously stored, your handcrafted aloe vera oil should maintain its efficacy for approximately 2-3 months. Incorporating the optional vitamin E can often extend this shelf life even further. Prior to each use, always conduct a quick check for any noticeable alterations in its aroma or visual appearance.
Embracing the creation of your own aloe vera oil is an incredibly empowering and gratifying step toward taking complete control of your hair care journey, utilizing only the purest natural ingredients. Armed with this comprehensive, easy-to-follow guide, you now possess all the essential knowledge to produce a batch that seamlessly integrates into your regimen, promising you softer, more beautifully manageable hair.
Why not dedicate some time this weekend to give this remarkable DIY a try and experience the incredible difference firsthand? Both your hair and your budget will undoubtedly express their profound gratitude.
Burning Questions? Your Aloe Vera Oil FAQ Answered!
**How quickly can I expect to see results from using homemade aloe vera oil on my hair?**
While individual experiences can certainly differ, a significant number of users report experiencing noticeably softer hair and improved moisture levels after just a few consistent applications, typically within a span of 2-4 weeks.
**Is aloe vera oil suitable for hair that has been colored or chemically treated?**
Absolutely, it’s generally considered a gentle option. However, as with any new product, always perform a small patch test first. In fact, it can be particularly beneficial in helping to replenish much-needed moisture to hair that has undergone processing.
**Do I need any specialized equipment to safely prepare aloe vera oil at home?**
Not at all! You can confidently create this oil using only standard kitchen tools: a basic saucepan, a sharp knife, and a simple strainer. There’s no need for any fancy gadgets to achieve truly fantastic results.
**Disclaimer**: This article provides information for educational and general informational purposes exclusively. It is not intended to serve as a replacement for professional medical or dermatological advice. Prior to incorporating any new hair care products, especially if you have known allergies, pre-existing skin conditions, or other health concerns, please consult with a qualified healthcare provider. Be aware that individual results may vary significantly