Unlock Healthier Hair: DIY Aloe Vera Oil for Enhanced Strength and Fullness
Many individuals experience a gradual decline in hair vitality, noticing strands become finer, drier, and more susceptible to damage. This can subtly impact self-assurance during daily routines, from styling to simply glancing in the mirror. The continuous quest for effective remedies often leads to costly commercial products filled with synthetic ingredients that frequently fall short of providing the gentle, deep nourishment hair truly needs. Happily, a straightforward, plant-derived solution using fresh aloe vera presents an accessible, natural path to cultivating the appearance of healthier, more lustrous hair, all from the comfort of your home.
This comprehensive guide will walk you through an uncomplicated, step-by-step process to formulate your very own homemade aloe vera oil. And for those keen to maximize their efforts, a smart storage technique will be revealed towards the end, ensuring your carefully crafted batch remains fresh and potent for an extended period.
Why Aloe Vera is a Must-Have in Your Hair Care Arsenal
For generations, aloe vera has been revered for its remarkable soothing and moisturizing capabilities. But what elevates its status in the realm of hair care? This succulent plant is replete with essential vitamins – A, C, and E – alongside vital amino acids and enzymes, all working synergistically to deeply nourish both the scalp and individual hair strands. Scientific observations, including a 1998 investigation cited by Healthline, indicate that aloe vera can significantly alleviate scalp discomfort and foster a pristine, optimal environment conducive to robust hair development. Furthermore, various expert reviews, such as those featured on Medical News Today, underscore its abundant mineral profile, including zinc and copper, which are instrumental in preserving healthy hair architecture. However, its true distinction lies in its transformation: when processed into a straightforward DIY aloe vera oil (more accurately, a potent concentrated extract), it becomes exceptionally simple to apply and readily absorbed. Consistent users frequently note a noticeable improvement in hair softness and a vibrant, healthy sheen. The ultimate advantage? Complete oversight of every component.
Understanding the Science: Aloe Vera for Hair Health (Beyond the Buzz)
Adopting a grounded, evidence-backed perspective, numerous laboratory analyses and small-scale clinical studies have delved into the efficacy of aloe vera’s polysaccharides. These compounds are believed to play a crucial role in retaining moisture within the hair shaft and enhancing the visual elasticity of strands. While an animal study showcased noticeable advancements in tissue regeneration, a wealth of user testimonials and professional dermatological assessments consistently highlight benefits such as diminished scalp flakiness and improved hair manageability. It’s important to set realistic expectations: there are no miraculous overnight transformations. Nevertheless, consistent and gentle application can profoundly contribute to the appearance of revitalized, fuller-looking hair by promoting optimal scalp comfort and deep hydration. This is precisely why this accessible homemade aloe vera oil technique has quietly garnered favor among individuals prioritizing clean, natural hair care solutions.
Essential Supplies: Crafting Your Own Aloe Vera Hair Oil
Assembling the necessary items is remarkably straightforward. Below is your comprehensive checklist, whether you’re sourcing from a store or your own garden:
- 4–5 sizable, fresh aloe vera leaves (prioritize plump, vibrant green specimens for maximum potency)
- 2–3 cups of pure filtered or distilled water
- One medium-sized pot, preferably stainless steel or glass
- A fine-mesh sieve or several layers of cheesecloth
- A clean glass container with an airtight lid, ideal for long-term storage
- A sharp culinary knife and a stable cutting board
That’s truly all there is to it! You won’t need any specialized gadgets or even essential oils at this stage (though a few drops can be incorporated later for added fragrance or benefits, if desired).
Detailed Instructions: Crafting Your Own Aloe Vera Hair Oil
Adhere precisely to these instructions, and you’ll have a fresh, potent batch prepared in less than an hour. This method closely emulates time-honored extraction techniques designed to carefully draw out the plant’s valuable compounds.
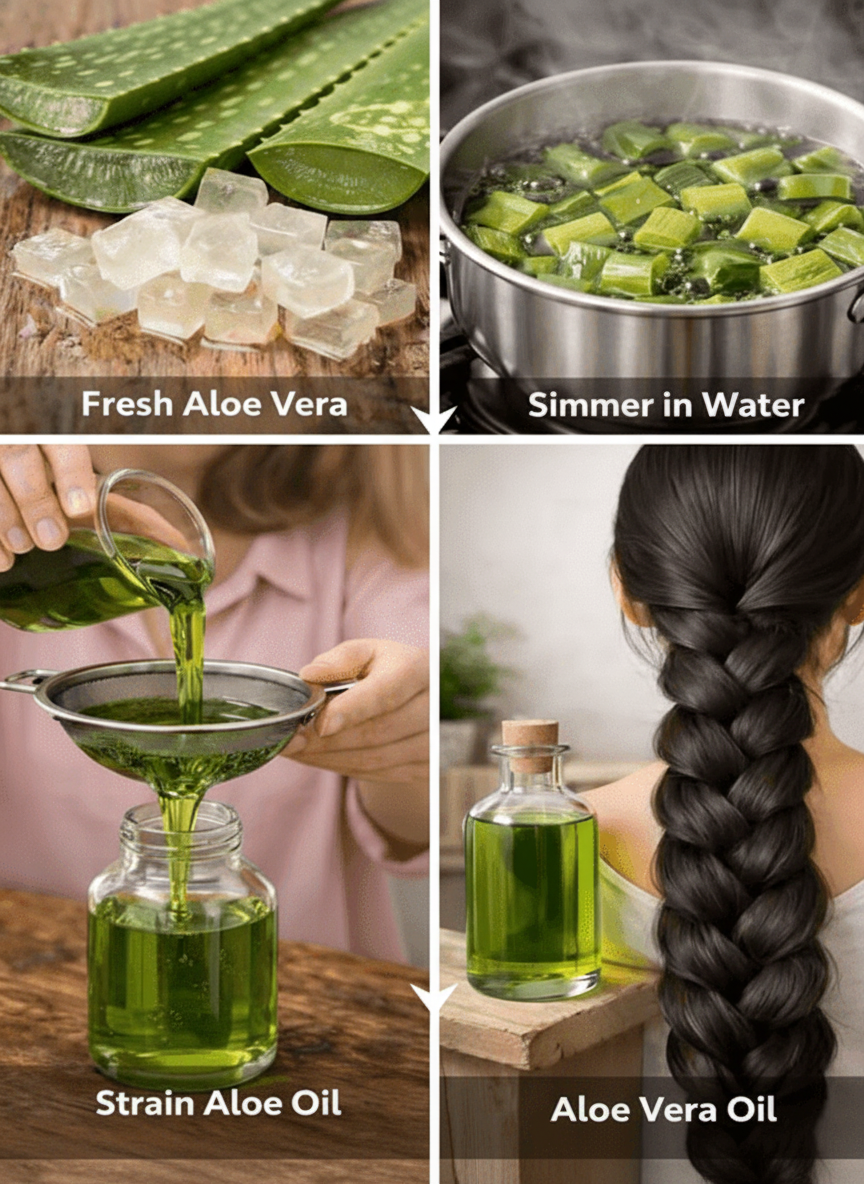
Step 1: Initial Preparation of Your Aloe Vera Leaves
Begin by meticulously washing the aloe vera leaves under cool, running water to dislodge any surface impurities or dirt. Gently pat them dry using a clean towel. With a sharp knife, carefully remove the serrated, spiky edges from each leaf. You then have two options: either slice each leaf down its length and meticulously scoop out the translucent gel, or simply chop the entire cleaned leaf (including both the inner gel and green outer layer) into small, approximately 1-inch (2.5 cm) segments. Expert tip: Chopping the leaves into smaller pieces or cubes facilitates a more efficient release of moisture and beneficial compounds during the simmering process.
Step 2: Gentle Simmering for Potent Extraction
Carefully transfer the prepared aloe vera segments into your pot. Pour in just enough water to fully submerge them – typically around 2–3 cups, adjusted based on the quantity of aloe you’re using. Gradually bring the mixture to a delicate simmer over medium-low heat. It’s crucial to avoid a vigorous boil; aim for a consistent, soft bubbling action for approximately 20–25 minutes. Observe as the water transforms into a striking, vibrant green hue – this visual cue signifies that the plant’s valuable compounds are successfully infusing into the liquid. Stir the mixture periodically. Your kitchen will begin to fill with a clean, subtly earthy aroma. This unhurried, gentle simmering technique is indeed the cornerstone for achieving a highly potent yet remarkably smooth extract, ideal for topical application.
Step 3: Strain and Collect Your Pure Aloe Vera Extract
Once the simmering is complete, take the pot off the heat and allow the mixture to cool for about 10 minutes. Position your fine-mesh strainer directly over the clean glass jar. For an exceptionally clear extract, you might consider lining the strainer with several layers of cheesecloth. Carefully pour the aloe vera mixture through the strainer, ensuring all liquid is collected in the jar below. Gently press down on the remaining aloe vera solids in the strainer to extract any lingering liquid. Discard the spent plant material.
Step 4: Optimal Storage and Application Tips
Now you have your fresh, potent homemade aloe vera oil (extract)! To ensure maximum longevity and freshness, securely seal the glass jar with its airtight lid. Store it in the refrigerator, where it will remain fresh and effective for up to 2-3 weeks. For application, simply take a small amount and gently massage it into your scalp and hair strands. Leave it on for at least 30 minutes, or even overnight for a deeper treatment, before rinsing with a mild shampoo. Consistent use will yield the best results for healthier, more radiant hair.
Embrace the simplicity and efficacy of this natural hair treatment. Your hair will thank you for the gentle, chemical-free nourishment!